| Author |
 Topic Topic  |
|
|
allisstuff
40 Posts |
 Posted - 11/03/2010 : 19:03:45 Posted - 11/03/2010 : 19:03:45


|
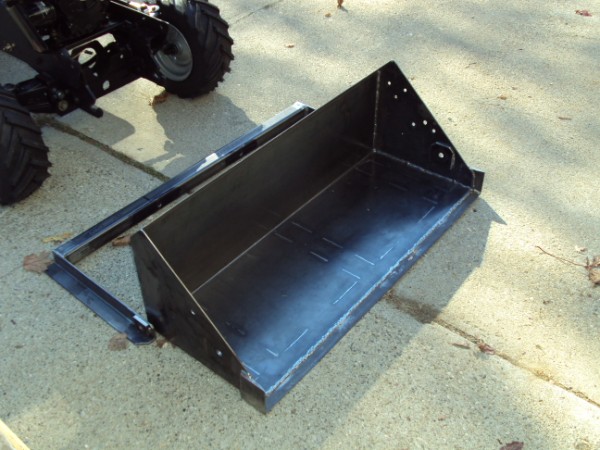
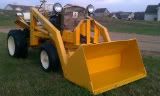
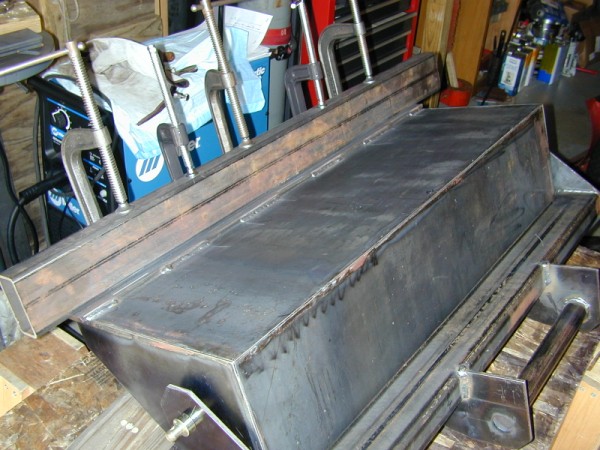
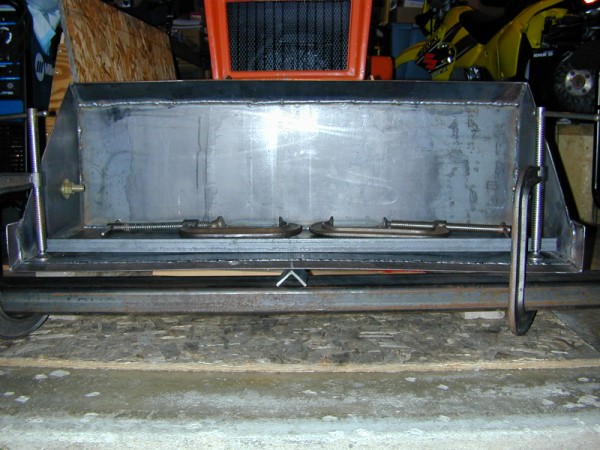
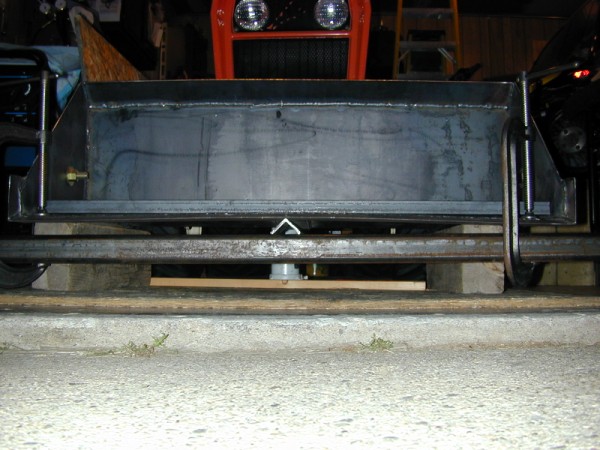
Here are some photos of the front bucket I fabricated for my Sunstar. I want to give my thanks to Phil (Skunkhome) who provided measurements from his bucket on several occasions when I was having trouble figuring out some dimension. Phil asked that I post when I was finished, so here you go.
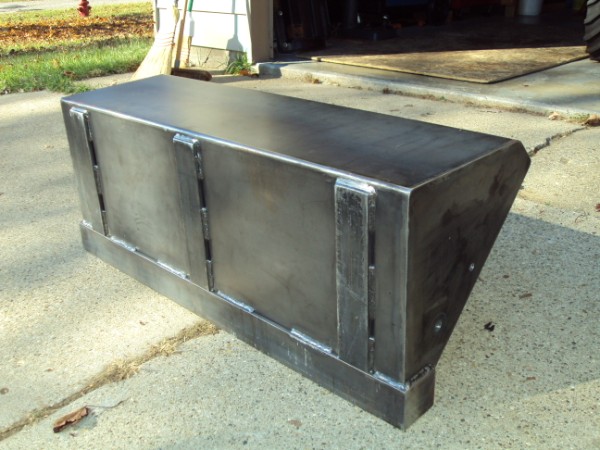
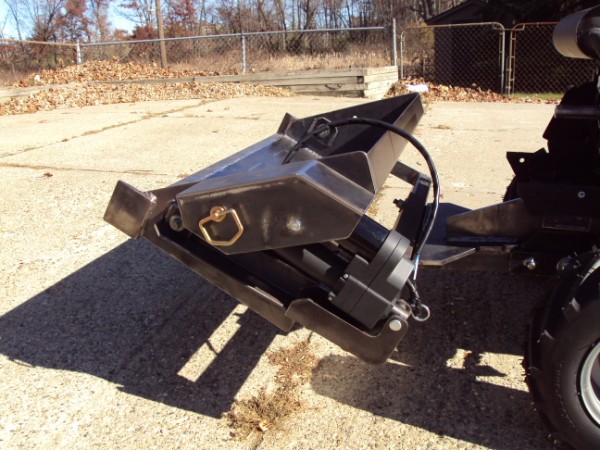
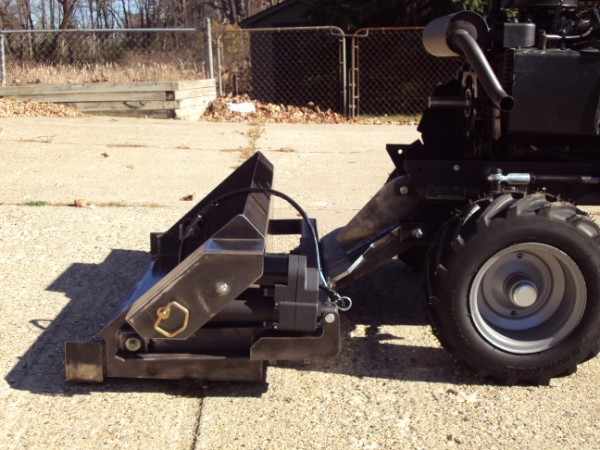
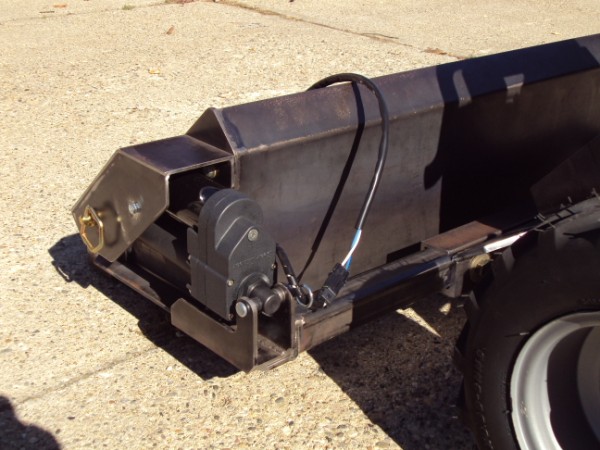
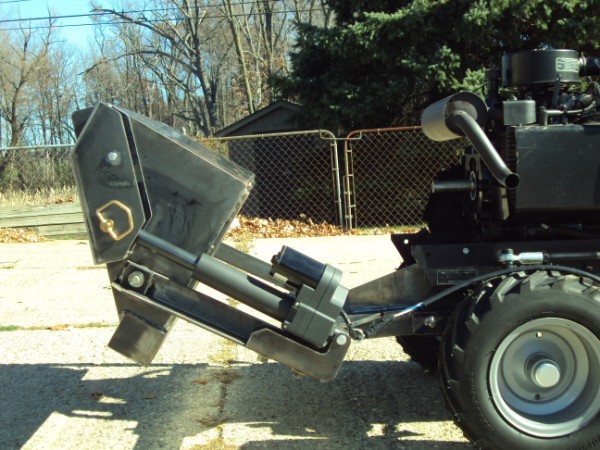
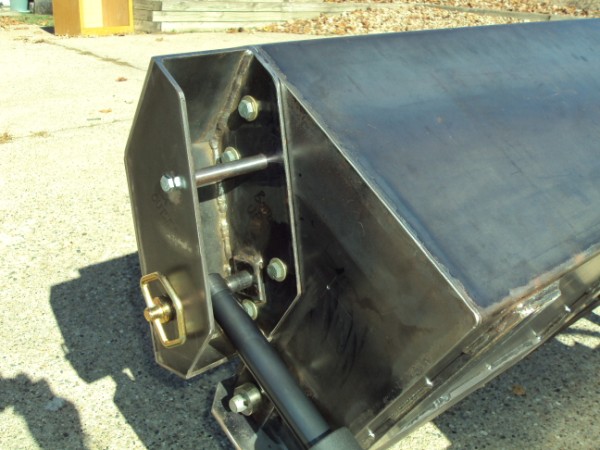
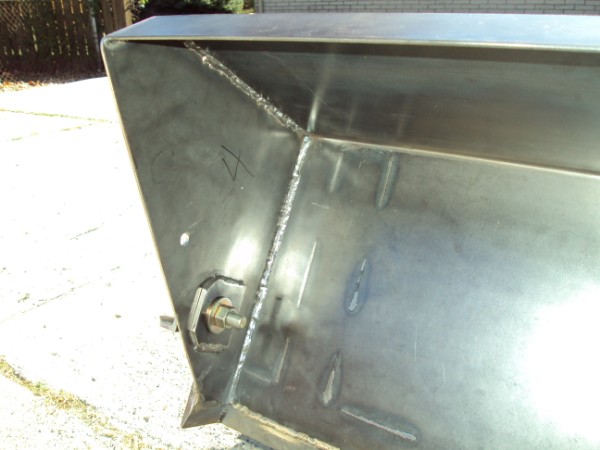
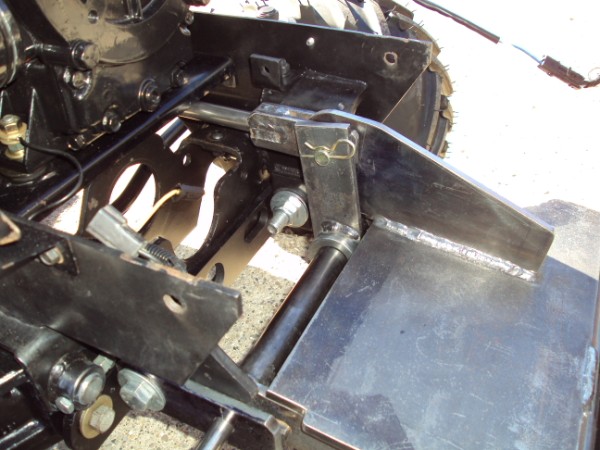
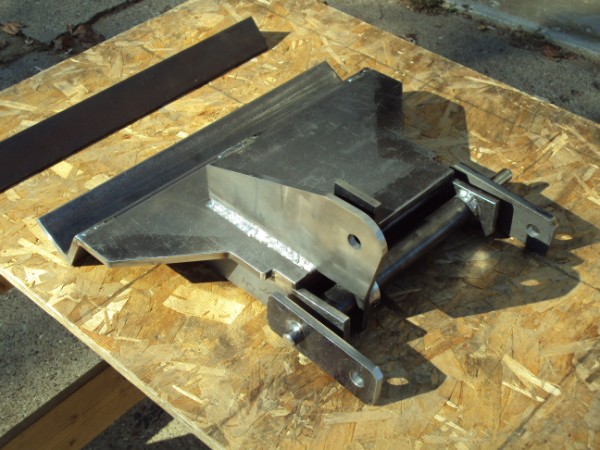
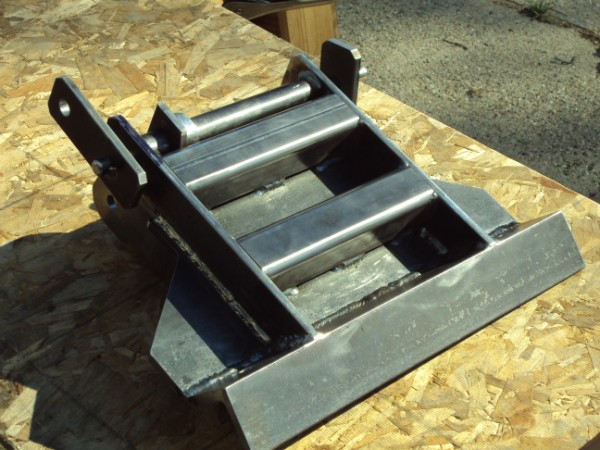
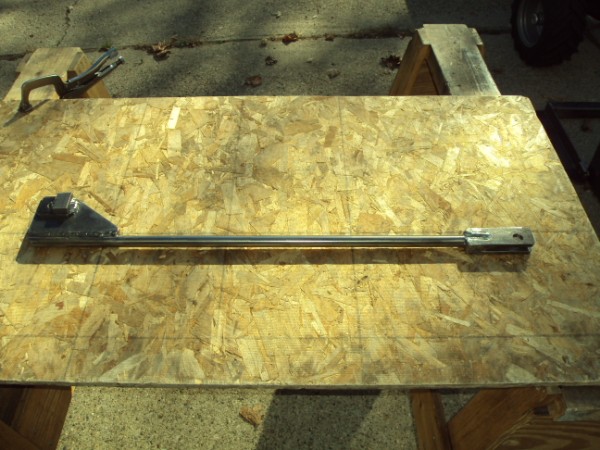
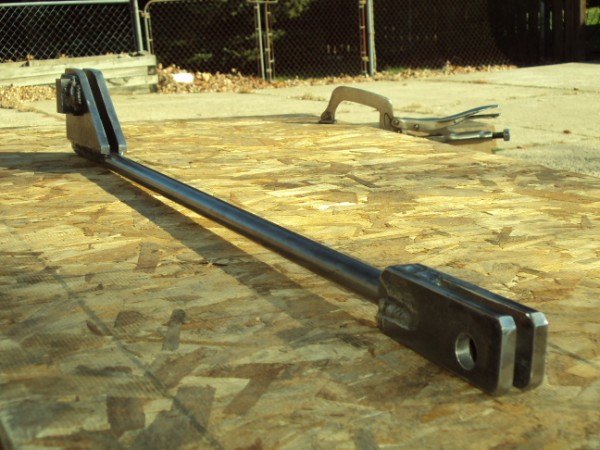
The bucket mimics the bucket from the Buccateer brand bucket but I changed the cutting edge from a piece of 3/16" flat stock to a 3/8" x 3" high carbon beveled cutting edge for more wear resistance. Across the bottom of the bucket are three 3/8" x 2-1/2" wear skids. The bucket dumping actuator arrangement and lifting frame mimic the Johnny Bucket design with modifications to accomodate my pivot pin arrangement. The hitch is my own design. I have 30 degrees of up travel and I should have 15 degrees of down travel, but when I tried to lift up the front of the tractor with the bucket it would not. Looking at the lift rod under the tractor, it bows when I try to put it into compression. I think I'll add a double to the bottom of the lift rod and that should increase the bending moment and hopefully it won't bend. It probably explains why the Sunstar hitch for the blade and snowblower have springs built into them to limit the actual down force that can be applied. In addition to the bucket I also fabricated by own version of the lift rod that is easier to fabricate than the version they have (not less expensive, but easier to fabricate).
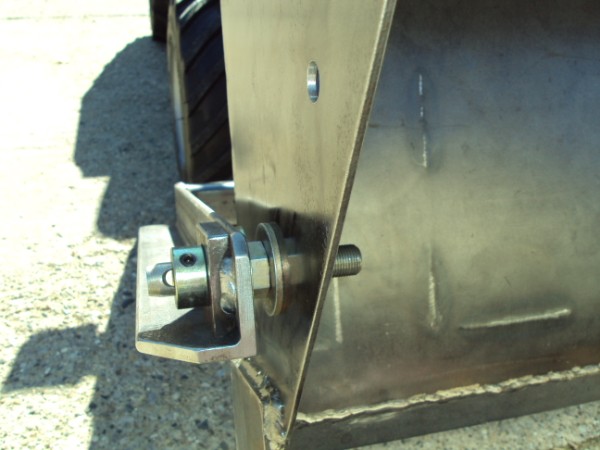
The bucket pivots on Cat. 0 adjustable pins that are 5/8" diameter. These make for a very strong pivot arrangement.
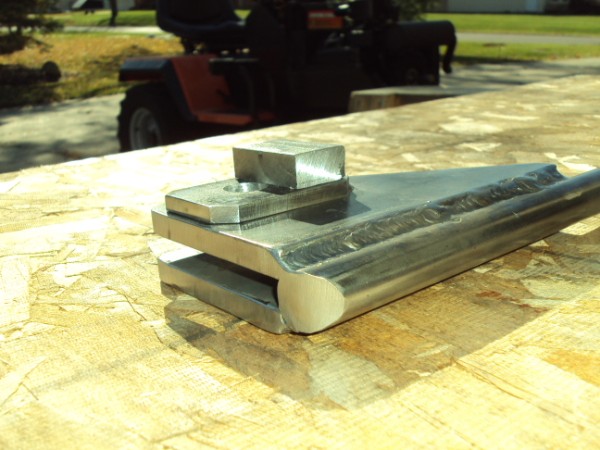
The round tube on the hitch is a piece of 1-1/4" DOM tubing that has been reamed to 16 mm (0.630) and this pivots on the 5/8" rod that is held stationary with respect to the tractor frame. The 5/8" rod is welded to one of the side plates while the other side plate is free to slide along the rod. These side plates attach to the tractor frame with pins or bolts and keep the hitch secured to the tractor frame. By not allowing the 5/8" rod to pivot with respect to the tractor frame I hope to minimize the wear on the tractor frame. The hitch side arms are 3/8" x 2" and are welded to a piece of 2-1/2 x 2-1/2" x 3/8" angle iron. The top plate is 3/8" thick and the square tubing underneath is 2" x 2" x 1/4". The hitch itself weighs approx. 42 lbs.
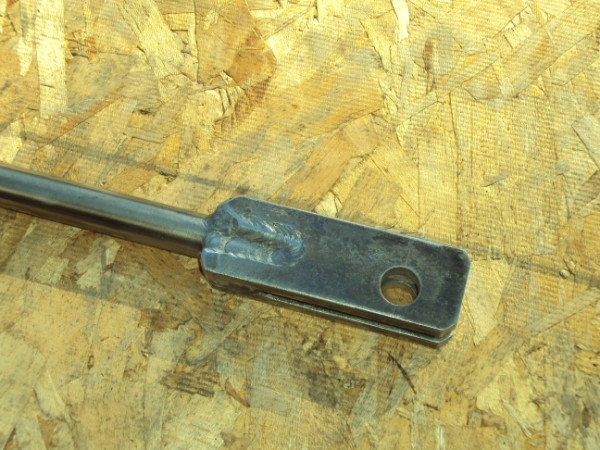
I purchased the actuator from Johnny Products and fabricated the upper mount from 3/16" HR flats and the lower mount from 1/4" HR flats.
I still need to run the wires from the actuator to the tractor and mount the switch, but I was in such a hurry to get some paint on it before the snow flies, I forgot to add mounting points for the harness clips. Might just need to use tie straps or drill & tap for clips.
I was able to lift myself (200 lbs) standing in the bucket on the front of the cutting edge, so it should be able to lift a full load of dirt in the bucket.
I also just finished upgrading the front axle to the newer version that uses tapered roller bearings in the wheels. I added new LH & RH spindles, new axle end pivot pins, new steering cylinder rod end, new kingpin bushings, new bearings, seals, and dust caps (Hint: the bearings, seals, and dust caps are from a kit for trailer bearings for a 1" spindle and work fine. Each side ran me approx. $12.00). The front end is nice and tight now. I picked up the wheels a while back on Ebay and the front tires are new Super Lugs.
|
Edited by - allisstuff on 11/03/2010 19:05:14 |
|
|
adamf203
USA
384 Posts |
Posted - 11/03/2010 : 19:17:34

|
| That is phenomenal |
 |
|
|
Talntedmrgreen
USA
4110 Posts |
Posted - 11/03/2010 : 19:33:41
|
| Ditto...fine work. Very fine work. You must be pretty darn proud of that! Great job, and great documentation of the setup. |
    |
|
|
|
Cvans
USA
4427 Posts |
Posted - 11/03/2010 : 19:49:59
|
Looks like a well thought out and executed project. I can see the line starting to form for prospective buyers. Thanks for the photo's
|
East Central South Dakota
The democracy will cease to exist when you take away from those who are willing to work and give to those who would not.
Thomas Jefferson
|
|
|
|
B112
USA
5262 Posts |
Posted - 11/03/2010 : 19:56:26
|
| That is some fine work there. I think that bucket design can take more jabbing stress than the loaders I've seen. Again nice works and thanks for sharing! |

Michael |
|
|
|
thepatriot
USA
98 Posts |
Posted - 11/03/2010 : 20:14:20
|
| Very nice work! |
AC B10-Simplicity LL101,7010,7110,7790DIESEL
|
|
|
|
B10Dave
Canada
1951 Posts |
Posted - 11/03/2010 : 21:12:50
|
| Awsome fabrication job. Should prove to be a very useful addition to your tractor. B10Dave |
Money can't buy you happiness.
It can however buy you a beer.
And that is close enough.
|
|
|
|
ATF
USA
1892 Posts |
Posted - 11/03/2010 : 21:45:21
|
| NO KIDDING, THAT LOADER IS A WORK OF ART, freakin awesome job guy, let me know if you decide to sell the Sunstar, with the loader of course |
 |
|
|
|
freddie
USA
2129 Posts |
Posted - 11/03/2010 : 22:11:04
|
| i have say that you thought that all the way threw. great workmanship. and the ram is not cheap eather. looks to be a 12 volt hydro with resavor.or is that a gear drive? |
|
|
|
allisstuff
40 Posts |
Posted - 11/03/2010 : 22:52:18
|
quote:
Originally posted by freddie
i have say that you thought that all the way threw. great workmanship. and the ram is not cheap eather. looks to be a 12 volt hydro with resavor.or is that a gear drive?
The actuator is a Warner Linear Actuator. I used the 6 inch stroke model.
http://johnnyproducts.com/JP_Parts_HTMs/Linear-Actuator-Plus-hardware.htm |
|
|
|
1014211
USA
2317 Posts |
Posted - 11/04/2010 : 07:22:39
|
| Unbelievable isn't a strong enough word. That is something to be proud of. Nice work. |
Jon
 |
|
|
|
Roy
USA
1366 Posts |
Posted - 11/04/2010 : 09:29:07
|
Beautiful work. 
Carry on, |
Roy
 |
|
|
|
freddie
USA
2129 Posts |
Posted - 11/04/2010 : 09:58:34
|
now we cant wait to long for a video of it working  |
|
|
|
midnightpumpkin
USA
888 Posts |
Posted - 11/04/2010 : 12:18:43
|
Super job!
Where did you buy the cutting edge material and how did you bend the ends of the cutting edge?
I would like to re-do the cutting edge on the bucket of my ARK600 loader, that material looks to be ideal.
Thanks,
John U |
|
|
|
allisstuff
40 Posts |
Posted - 11/04/2010 : 18:52:29
|
quote:
Originally posted by midnightpumpkin
Super job!
Where did you buy the cutting edge material and how did you bend the ends of the cutting edge?
I would like to re-do the cutting edge on the bucket of my ARK600 loader, that material looks to be ideal.
Thanks,
John U
Discount Steel out of Minneapolis, MN
3/8" x 3" is what I used but they have many other sizes. Shipping is reasonable, particularly since this was the only source I found that had the exact material I was looking for. I've used them for other shapes also, when I could not find what I was looking for locally. For flat stock, round stock, the cutting edge, etc. they ship the material in a heavy gauge cardboard tube with plywood caps stapled to the cardboard tube. No shipping damage what so ever.
http://www.onlinemetalstore.com/items/1055_Steel_Beveled_Cutting_Edge.cfm
From what I've read on-line regarding welding cutting edges, you have to preheat the cutting edge to approx. 400 deg F before welding and then post heat after welding to relieve welding stresses. You also have to use low hydrogen rods, but since I'm using a MIG welder, that wasn't an option. I'm no welder by any means, but I experimented by MIG welding a short piece of the cutting edge to 10 ga. HR steel sheet without preheating. Then I bent the cutting edge back against the weld and the weld tore out of the cutting edge material. I then repeated the experiment but I preheated the cutting edge before welding. Not having an IR temp gauge or temperature crayons, I used a spray bottle with room temp water and heated the cutting edge until I could spritz some water droplets on the surface and it would dance and skitter off the surface. I was able to bend the short sample of cutting edge back against the steel sheet over 90 degrees or so using a hammer and holding the steel sheet in a vice if I remember correctly without any tear out of the cutting edge or cracks in the weld.
To weld the cutting edge to the bucket I preheated as described above and I would weld a short section of 4-6 inches starting in the center and alternating left and right until I worked my way out to the ends across the entire forward edge as shown in the photos above. I would post heat each weld section for another 5 minutes or so and allow the part to air cool out of any breezes. Across the back I skip welded short sections as shown. During the welding I clamped the cutting edge to the bucket with about five 8" c-clamps with a section of 2x4x1/4" rectangular tube as a straight edge to keep the cutting edge warpage at a minimum. Using this technique, I did not have any issues with cracked welds. I've built three buckets using this technique.
Here are some photos showing how I fixtured the cutting edge when welding.
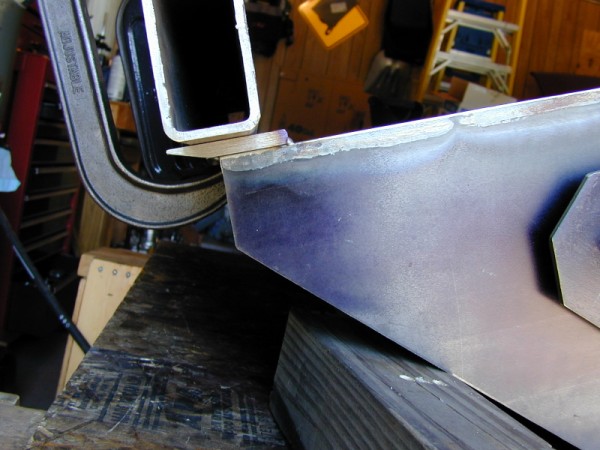
The ends of the cutting edge are not bent, but rather short 3" sections that are welded to the ends.
With all three buckets, after I've added the wear skids to the bucket and welded on the ends, I had a slight "smile" to the cutting edge with both ends higher than the middle. I was able to remove the smile by bending the cutting edge down using the following fixture and technique. This was for the first bucket I fabricated for my other tractor. You have to take it in steps, crank down the c-clamps on both sides and then release the load and see if the "smile" was eliminated uaing a straight edge held against the bottom of the cutting edge. If not, then retighten but pull the edges down some more. Keep sneaking up on it until you remove the smile to your satisfaction. After straightening the cutting edge I did not have any cracked welds. Most of the info I found on-line regarding welding cutting edges dealt with heavy equipment. These buckets on garden tractors will not see anywhere near the loading or stress that these buckets on larger equipment will see.
Here's a couple of links that discuss the need to preheat before & after welding. I will state that I did not post heat to the 1200 deg. range, probably more in the 400-500 deg range, same as my preheating. There's a lot more information on-line.
http://www.badgerattachments.com/pdf/4Cust_Serv_GuideGpLmBkt.pdf
http://www.shopfloortalk.com/forums/showthread.php?t=414
http://www.shopfloortalk.com/forums/showthread.php?t=414&page=2
http://www.millerwelds.com/resources/communities/mboard/showthread.php?10874-Cutting-Edge/page2&highlight=cutting+edge
Anyway, this is how I've done it and it seems to have worked out alright for my use. With more tools and equipment I might do it differently, but I have to use the equipment that I have at my disposal.
|
Edited by - allisstuff on 11/04/2010 19:07:52 |
|
|
|
B-16_IC
USA
2823 Posts |
Posted - 11/04/2010 : 19:32:32
|
That is super stout! Fine fab work, some definite talent in your hands and mind! |
Life is all about paying. Pay attention, or pay the consequences, the choice is yours. Rich |
|
|
| |
Topic |
|
")
